
Painting a picture is one thing, painting a nightstand or a side table is another, but painting your whole countertop is a whole different ball game.
Don’t get me wrong, repainting your kitchen countertops is very doable, and something DIY homeowners are doing every day. Painting countertops create a whole new look and increase your home value. However, to get a professional look at the end of the day, you need to educate yourself.
Painted countertops have taken the DIY world by storm, but this project is NOT for the faint of heart. If you’re looking for a great way to update your bathroom or kitchen without the cost of a full remodel, then you might want to consider painting the countertops. It is a fraction of the cost of new counters, and you can create completely customized looks to get exactly the color you’re looking for. However, this project requires patience, prep, patience, planning, and did I mention patience?
I’ve scoured every tutorial available to find the tips and tricks you need to create that beautiful finished product. Before you tackle this project, be sure you avoid these common countertop painting mistakes.
#5-Inadequate Preparation
This is a common problem with any painting project, but with countertops, it is only magnified. Refinishing your countertops is not something you want to do fast and easy, take your time and prep correctly. Be sure to cover everything you don’t want to be painted and tape off everything carefully.
Then, bust out the sanding block and get to work. An electric sander creates so much dust that it’s nearly impossible to clear all the dust out of the air to create that smooth finish you want. The hand sander is longer and harder to do, but creates the smooth finish that you want.
Skip this step and your paint may likely peel right off after all your hard work.
#4-Choosing the wrong tools for the job.
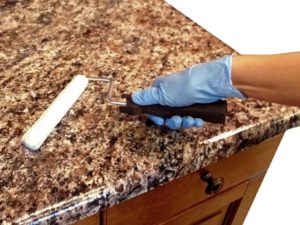
Not all paint is created equal. The same paint you use for your walls will not hold up on a countertop. Countertop Paint is designed specifically for countertops and is formulated to hold up to a lot of abuse, high heat, and endless spills. The kitchen and bathrooms get a lot of traffic. If you want your effort to last, get the right paint and the right tools.
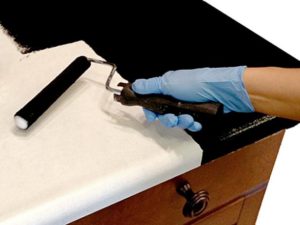
Countertops will show brush strokes, no matter how good you think you are. The best way to apply countertop paint is with a big roller. Make sure you use a smooth textured roller, such as this one, to avoid a bumpy counter. Use a small brush for details and edging, like this one
. Apply each coat with the same tools to ensure your brush strokes on the base coat don’t show through to the top.
If you are repainting a large counter space, you may want to consider buying a paint sprayer. Paint sprayers are able to give you a seamless finish and get in corners and edge better than a brush. There are several paint sprayers out there, and sadly they aren’t equal. This paint sprayer is reasonably priced, strong enough to do large projects, and is durable enough to last years, helping you paint even more projects in your home.
#3-Rushing
Painting countertops takes time. This is a project that should take at least one week, possibly two, and it’s a great time to plan a vacation after you’re done so you can let it dry completely for 4-7 days before you actually use it.
Each coat needs to have a chance to dry completely before you continue, which is usually 24-48 hours. Most experts recommend 3 coats of paint and 4 coats of sealer, which means you have at least 7 days of painting. Then you need at least one week to two to allow the countertop sealant to cure. Summer is a great time to do this project. Eat outside on a picnic table and the heat will quicken the curing period.
#2-Sealing
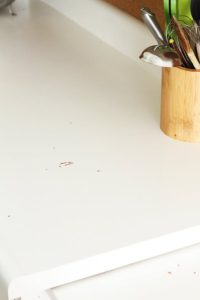
Chalkandchocolate.com shared her honest experience painting countertops. She forgot to seal it, and let it completely cure. One month after her paint job is started chipping.
Seal your paint. Seal it often and seal it well. This is one area where you don’t want to scrimp and save. Instead, splurge on the best sealer you can find. You do not want clear coat polyurethane, get an acrylic sealer that is designed for countertops.
Get one that is semi-gloss or gloss which are made for durability. If you use a cheap sealer, it can ruin the entire project. The paint will not hold up on its own, it needs the protection of a sealant. You also want to be sure your sealant is food safe since your countertop will be in close contact with food.
#1-Don’t Forget To Recaulk
After you are done, go around the edges of your countertop and recaulk all of them. This prevents any water from getting caught in between your countertop and the wall, and helps to create a nice sleek look.
A clear caulk won’t leave any white lines and looks seamless and professional. Are you ready for the plunge? If you paint your countertops, please comment below with a picture!

Like this article? Save your favorite pin below!


This is a GREAT list of important tips! I painted my countertops many years ago. I used a faux stone paint in CHERRY PINK — they were oh so cute. Such a huge improvement over the boring beige. And for the most part, they were great and lasted many years. But every once in a while, when I would accidentally leave water on the counter or there was just a lot of moisture, the paint would turn a lighter shade and you could tell it had gotten wet. My problem, in hindsight, was that I didn’t seal it well enough and then never sealed it again after I originally did it! I honestly didn’t even consider re-sealing it. But hey, we live and learn! I may try it again and this is all awesome information. Thanks so much!